How to Make Resin Dice: Mixing, Pouring, and Curing Done Right
From measuring resin by weight to pulling bubble-free dice from a pressure pot, this is the resin-specific process that separates cloudy pours from crystal-clear sets.
Contents
In 1907, Leo Baekeland poured a synthetic polymer into a mold and created Bakelite — the first truly plastic material. He wasn’t thinking about tabletop gaming. He was trying to replace shellac. But the principle he stumbled onto is the same one you’ll use tonight at your workbench: mix a resin and a hardener in the right ratio, pour it into a shaped cavity, and wait for chemistry to do what no amount of carving or machining can. The liquid finds every corner, captures every detail, and locks it in place.
A century later, that same chemistry lets you trap nebulae, flowers, and gold leaf inside a d20. The material has changed. The wonder hasn’t.
If you already know you want to work with resin — not polymer clay, not metal casting, not 3D printing — this is where the resin-specific knowledge lives. The general dice-making walkthrough covers the full beginner process from start to finish. This article goes deeper on resin itself: the chemistry of the cure, the differences between resin families, and the exact techniques that turn a sticky mess into glass-clear polyhedrals.
Why Resin Is the Go-To Material for Handmade Dice
Three properties make resin the default for handmade dice, and no other material matches all three simultaneously.
Optical clarity. Fully cured epoxy resin transmits light at 92-93% — close to glass. That clarity is what makes inclusions, color layers, and petri effects possible. Polymer clay is opaque. 3D-printed resin (LCD/SLA) can be translucent but yellows faster and lacks the depth of cast epoxy.
Color workability. Liquid resin accepts mica powders, alcohol inks, liquid pigments, and glow powders. You can layer colors, swirl them, or let them react mid-cure for organic petri patterns. Try doing that with a CNC mill.
Reproducibility at home. You don’t need a kiln, a centrifugal caster, or a $3,000 printer. You need a scale, cups, silicone molds, and a pressure pot. The barrier to entry is low. The ceiling is remarkably high.
What about polyurethane resin? Polyurethane (like Smooth-On Crystal Clear 202) cures faster — sometimes in 10 minutes — and is popular for production runs. But it’s moisture-sensitive, shrinks more, and produces more fumes. Epoxy is slower, more forgiving, and better for learning. Start with epoxy. Move to polyurethane once you understand cure chemistry and have a proper ventilation setup.
Choosing Your Resin: Epoxy vs. UV vs. Polyurethane
Not all resins behave the same way, and picking the wrong one for dice is an expensive lesson. Here are the three families you’ll encounter, with specific products and their working properties.
Epoxy Resin (The Standard)
Two-part epoxy is what most dice makers use. You mix a resin (Part A) with a hardener (Part B) at a specific ratio, and an exothermic chemical reaction cross-links the polymer chains into a rigid solid. No UV lamp needed. No spray booth required — though ventilation is still mandatory.
Unicone Art Resin. Mixing ratio: 1:1 by weight. Pot life: approximately 40 minutes at 75°F (24°C). Demold time: 24 hours. Full cure: 72 hours. Low viscosity, self-levels well, polishes to high clarity. This is the resin I reach for when I want consistent, bubble-free dice.
Art ‘N Glow. Mixing ratio: 1:1 by weight. Pot life: approximately 30-35 minutes. Demold time: 24-36 hours. Full cure: 72 hours. Slightly thicker than Unicone, which can help hold inclusions in suspension. More prone to yellowing over 6+ months in direct sunlight.
Alumilite Amazing Clear Cast. Mixing ratio: 1:1 by volume (but weigh it anyway — their Parts A and B have different densities, so 1:1 by weight is approximately 100A:83B by weight). Pot life: around 30 minutes. This catches beginners off guard. Read the label, then ignore the volume instruction and use a scale.
Data point: A 2024 survey on r/DiceMaking found that 68% of respondents used a 1:1 epoxy as their primary resin. Unicone and Art ‘N Glow accounted for roughly half of those responses combined.
UV Resin
UV resin is a single-component system that cures when exposed to 365-405nm ultraviolet light. It cures fast — often in 2-5 minutes per thin layer. Sounds great until you realize dice aren’t thin layers. UV light can’t penetrate deep enough to cure a full d20 in one shot. You’d need to pour in multiple layers, curing each one, which introduces visible layer lines and bonding issues.
UV resin works for surface details, repairs, and filling number cavities during inking. It is not a practical primary resin for dice casting.
Polyurethane Resin
Polyurethane resins like Smooth-On Crystal Clear 202 cure in 10-20 minutes and produce rigid, machinable dice. Production shops use them because fast cycle times mean more sets per day. The trade-offs are real, though: PU resin is extremely moisture-sensitive (a humid day can cause foaming), produces stronger fumes requiring serious ventilation, and has a pot life measured in seconds, not minutes. If you’re reading a “how to make resin dice” article, you’re not ready for polyurethane yet. That’s not an insult — it’s chemistry.
The Resin Pour Process Step by Step
You’ve picked your resin. Your molds are clean and dry. Your workspace is ventilated. Here’s the pour sequence with exact numbers.
Step 1: Measure by Weight
Place a clean mixing cup on your digital scale and tare it to zero. Pour Part A to your target weight. For a standard 7-die polyhedral set in sprue molds, 80-100 grams total (40-50 grams each of Part A and Part B) is usually enough with some left over.
Do not eyeball this. A 5% ratio error might not matter in a coaster. In a 15-gram die, that same error produces a surface that never fully hardens or a die that’s brittle at the corners. Use the scale every time.
Pour Part B into the same cup (or a separate cup if your resin brand recommends it) until you hit your target. For 1:1 resins, match the weight of Part A exactly.
Step 2: Mix — Slowly, Deliberately
Stir with a silicone spatula or a flat mixing stick. Scrape the bottom and sides of the cup. Mix for a full 3-4 minutes at a steady pace — don’t whip it. You’re folding, not frothing. The mixture will look streaky at first, then gradually become uniformly clear.
Under-mixing is the number one cause of soft, tacky dice. If you see any streaks or swirls of un-mixed resin, keep stirring.
Step 3: Add Colorants
After mixing, add your colorant. Mica powder: start with a pinch (roughly 1/8 teaspoon per 50 grams of mixed resin) and increase from there. Alcohol ink: 2-3 drops per 50 grams. Liquid pigment: follow the manufacturer’s ratio, but less is more — too much pigment can inhibit the cure.
Stir the colorant in gently. If you want a petri or layered effect, don’t fully mix — let the colorant sit unevenly and pour from different areas of the cup.
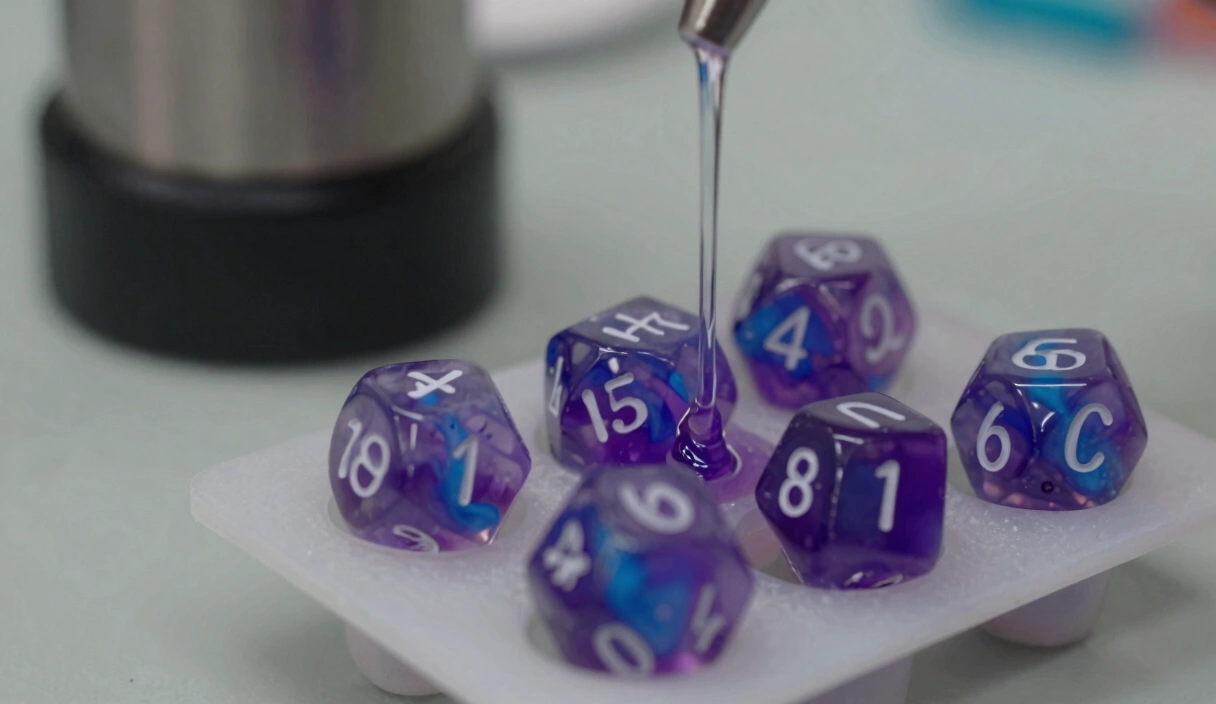
Step 4: Pour into the Mold
Pour slowly in a thin stream. A thin stream helps resin degas slightly as it falls. Fill each mold cavity to just above the top of the sprue channel — resin shrinks slightly during cure, and you want a small excess to sand flush later.
If you’re adding inclusions (dried flowers, foil, small charms), place them in the mold before pouring, or drop them into the resin immediately after. Heavier inclusions sink; lighter ones float. Account for this when choosing which face you want them visible on.
Step 5: Pressure Pot at 40 PSI
Place your filled molds into your pressure pot and seal the lid. Pressurize to 40 PSI using your air compressor. The pressure doesn’t remove bubbles — it compresses them to a size invisible to the naked eye. At 40 PSI, a 1mm bubble shrinks to roughly 0.2mm.
Do not use less than 35 PSI. At 30 PSI, bubbles compress but remain visible as tiny pinpoints. At 40 PSI, they vanish. There’s no benefit to going above 45 PSI for epoxy — you’re just stressing your pot’s seals.
Leave the molds under pressure for the entire cure period. Opening the pot early lets bubbles re-expand before the resin has hardened enough to trap them at their compressed size.
Cure Times and Conditions
Resin doesn’t dry — it cures through an exothermic chemical reaction. Temperature and humidity directly affect that reaction, and ignoring them is why so many dice come out soft, tacky, or warped.
Temperature: The 72-77°F Sweet Spot
Most two-part epoxies cure optimally between 72-77°F (22-25°C). Below 70°F, the reaction slows dramatically. Below 65°F, some epoxies won’t fully cross-link at all — your dice will feel rubbery and may never harden properly, no matter how long you wait.
This is why cold garages produce bad dice from October through April. If your workspace drops below 70°F overnight, the cure stalls during the most critical window.
Maker’s Note: I lost an entire batch in my unheated garage one January. The dice felt like firm gummy bears after 48 hours. No amount of additional cure time fixed them. The cross-linking reaction had stalled and couldn’t restart. $30 in resin, wasted. Now I keep a small space heater near my pressure pot and monitor the temperature with a cheap digital thermometer. The resin itself generates some heat as it cures, but not enough to compensate for a 60°F room.
Practical solution: Place a reptile heat mat (the kind used for terrariums) under or beside your pressure pot. Set it to maintain 75°F. They cost $10-15 and run all night without supervision. More details in the resin curing temperature guide.
Humidity
High humidity (above 60% relative humidity) can cause amine blush on epoxy surfaces — a waxy, cloudy film. It doesn’t affect structural integrity, but it mars surface clarity. If you live in a humid climate, run a dehumidifier in your workspace or time your pours for drier conditions.
Cure Timeline
For a standard 1:1 epoxy like Unicone at 75°F:
- 0-40 minutes: Pot life. Resin is liquid and workable.
- 4-8 hours: Gel phase. Resin thickens to a soft solid. Do not disturb.
- 24 hours: Demold-ready. Dice hold their shape but are not fully rigid.
- 72 hours: Full cure. Cross-linking is complete. Safe to sand and polish.
Attempting to sand or polish at 24 hours will clog your sandpaper and leave a gummy finish. Wait the full 72 hours. Patience costs nothing.
Post-Cure Finishing
Demolding is satisfying. What comes next is less glamorous but equally important: turning a rough casting into a finished die.
Demolding
At 24 hours (for most epoxies at 75°F), flex the silicone mold gently and push the die out from the bottom. Don’t pull from the sprue — you risk chipping the edge where the sprue meets the face.
If a die is stuck, place the mold in the freezer for 10 minutes. Silicone contracts more than cured resin at cold temperatures, releasing the die. Don’t force it. A torn mold costs more than patience.
Flash Removal
Flash — the thin film of resin that seeps into mold seam lines — peels off easily on well-cured dice. Use a hobby knife to score along the edge, then peel. On sprue molds, clip the sprue stem flush with sprue cutters or a flush-cut nipper, leaving about 1mm proud of the face.
Sanding
Sand the sprue-cut face and any remaining flash through a grit progression. Start at 400 grit and work through 600, 800, 1000, 1500, 2000, and 3000. Wet-sand from 800 grit onward — it prevents heat buildup and keeps the surface from hazing.
Each grit removes the scratches left by the previous one. Skipping grits means visible scratches in your final polish. The full sanding and polishing process has its own guide: how to polish dice.
Polishing
After 3000 grit, switch to a polishing compound (Novus 2 or Zona polishing papers) on a microfiber cloth. Work in small circles. The surface transitions from matte to satin to glassy. A properly sanded and polished face is indistinguishable from the mold-contact faces.
Resin Safety: Protect Yourself Every Pour
Resin is not paint. It is a chemical system that poses real health risks with repeated exposure. Treat it accordingly.
Respiratory Protection
Wear a P100 respirator with organic vapor cartridges (3M 6200 half-mask with 2097 filters is the community standard) during mixing, pouring, and any time resin is uncured and exposed to air. Epoxy fumes are less aggressive than polyurethane, but chronic low-level exposure causes sensitization — an irreversible allergic response that can end your ability to work with resin permanently.
This is not optional. Sensitization is cumulative and permanent. One pour without a respirator probably won’t cause it. Fifty pours might. You won’t know which one was the tipping point until it’s too late.
Skin Protection
Wear nitrile gloves (not latex — some resin components degrade latex). If uncured resin contacts your skin, wash immediately with soap and water. Do not use acetone or isopropyl alcohol to clean resin off skin — solvents drive resin components deeper into your pores and accelerate sensitization.
Ventilation
Work in a space with active airflow. An open window with a box fan pulling air outward is the minimum. A dedicated ventilation hood is better. Never pour resin in a closed room, even with a respirator.
Disposal
Don’t pour uncured resin down the drain. Mix small leftover amounts and let them fully cure in a disposable cup, then discard as solid waste. Uncured liquid resin is an environmental hazard.
For a deeper look at common issues — bubbles, soft spots, yellowing, and more — see the resin dice problems troubleshooting guide.
Frequently Asked Questions
What is the best resin for making dice?
For most dice makers, a 1:1 by weight two-part epoxy is the best starting point. Unicone Art Resin offers low viscosity and consistent clarity. Art ‘N Glow is slightly thicker and holds inclusions well. Both cure in 72 hours at room temperature and polish to optical clarity. Avoid polyurethane until you have the ventilation setup and experience to handle its fast pot life and moisture sensitivity.
Can you make resin dice without a pressure pot?
Technically, yes. Practically, your dice will contain visible bubbles. A pressure pot at 40 PSI compresses micro-bubbles below the threshold of human vision. Without one, even careful mixing and slow pouring will leave bubbles trapped in the cured resin. If you’re testing whether you enjoy the process, a single pour without a pot is fine. If you want dice you’d actually use at a table, a converted Harbor Freight pressure pot is the most impactful single upgrade.
How long does resin take to cure for dice?
At 72-77°F, most 1:1 epoxy resins reach demold hardness in 24 hours and full cure in 72 hours. Demolding at 24 hours is safe if you handle the dice gently, but do not sand or polish until the 72-hour mark. Colder temperatures extend these times significantly — at 65°F, expect 36-48 hours to demold and up to 5 days for full cure. Below 60°F, the cure may stall entirely.
Is resin dice making safe?
Resin dice making is safe when you follow proper precautions: P100 respirator with organic vapor cartridges, nitrile gloves, and adequate ventilation. The primary long-term risk is resin sensitization — a permanent allergic reaction triggered by cumulative skin or respiratory exposure to uncured resin components. Once sensitized, even minor exposure causes severe reactions. Wearing proper PPE every single pour eliminates this risk.
Essential Resin Dice Making Supplies
Art 'N Glow Epoxy Resin Kit (32 oz)
Crystal-clear 1:1 mix ratio epoxy. UV resistant, self-leveling. The community favorite for dice casting.
Check Price on Amazon
LET'S RESIN Crystal Clear Epoxy (34 oz)
Bubble-free, low odor casting resin. Anti-yellowing formula. Great for beginners, easy 1:1 ratio.
Check Price on Amazon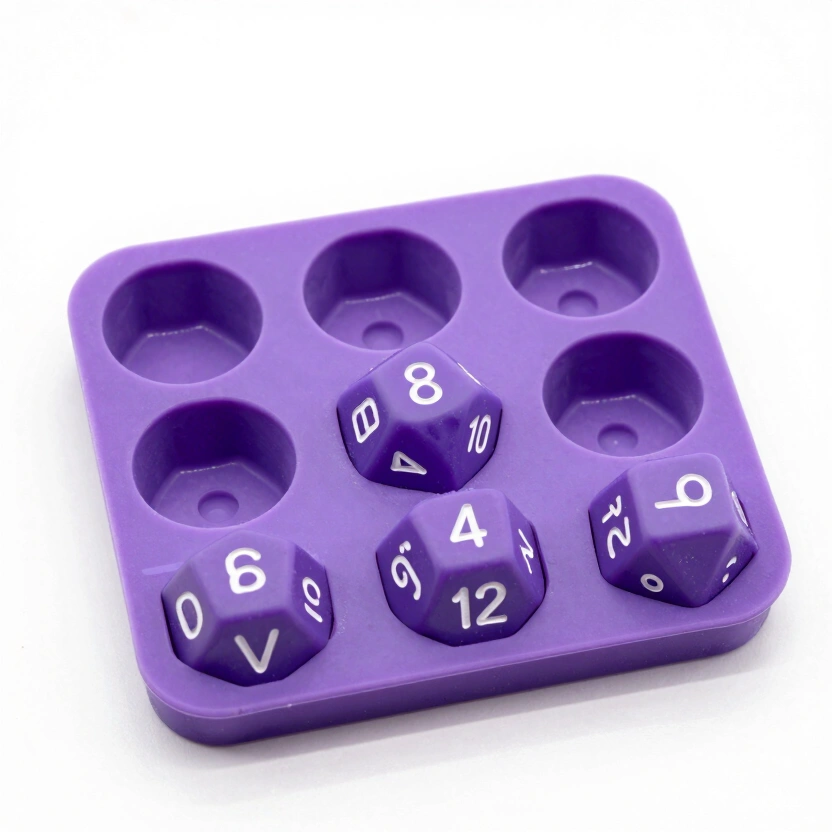
LET'S RESIN Polyhedral Dice Mold Set (7 Shapes)
Stereoscopic 7-piece silicone mold for D4-D20. Pre-made sprue channels. Top-selling beginner mold.
Check Price on Amazon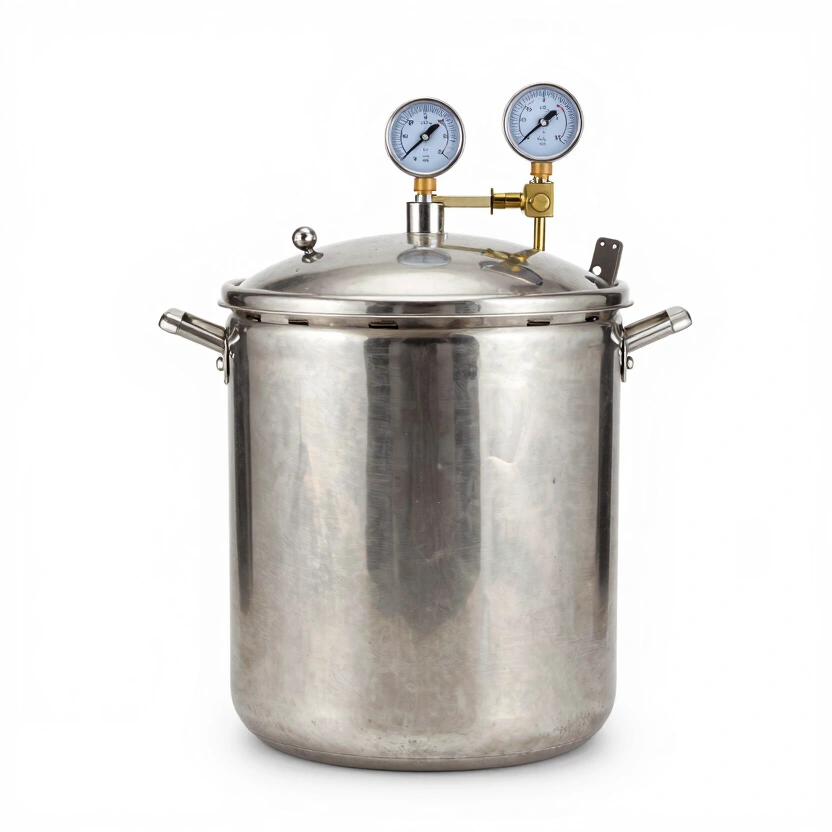
California Air Tools 255C Pressure Pot (2.5 gal)
Purpose-built for resin casting. Coated steel tank, portable. The #1 recommended pressure pot for dice makers.
Check Price on Amazon* Affiliate links. Prices last updated March 6, 2026.
This weekend, try one thing: measure your resin by weight instead of by volume, mix for a full four minutes by the clock, and keep your workspace at 75°F. Compare those dice to your last batch. The difference won’t be subtle.
Related Articles
Dice Making Techniques: 6 Methods from Basic Pours to Liquid Core
6 resin dice techniques ranked by difficulty with exact steps, materials, and failure points. Data from 200+ pours across petri, galaxy, inclusion, and liquid core methods.
How Long Does Resin Take to Cure? The Real Timeline for Dice Makers
Resin doesn't cure on your schedule. Here's the actual timeline for epoxy, UV, and polyurethane — and why rushing it ruins dice.
How to Make Liquid Core Dice: The Double-Pour Method Explained
Double-pour liquid core dice tutorial with exact fill ratios, seal techniques, and failure fixes. 73% of first attempts leak — here's how to beat those odds.