
Dice Inking and Number Painting: The Final Step That Makes or Breaks Your Set
A polished die with blank numbers is just a pretty shape. Here's how to ink and paint your dice numbers so they're sharp, legible, and built to last.
Contents
You’ve spent hours on this set. The resin is clear, the polish is flawless, every edge catches light the way you imagined when you first mixed the pigment. You pick up the d20 and roll it across the table. It lands on… something. The number is there — you can feel the engraving with your fingernail — but from twelve inches away, it’s invisible. A ghost number on a beautiful die that nobody can actually read.
This is where inking comes in. It’s the final step in making dice, and it’s the one that transforms polished shapes into functional game pieces. The good news: it’s also one of the easiest steps to learn, hardest to permanently ruin, and most immediately satisfying.
Why Inking Matters
Resin dice get their numbers from engravings in the mold — recessed channels cut into each face during the master die or 3D printing stage. After demolding and sanding, those channels are still there, but they’re the same color and finish as the rest of the face. Light passes through or reflects off them identically to the surrounding surface. The result: numbers that exist physically but disappear visually.
Data point: In a 2023 poll on r/DiceMaking, “hard to read numbers” was the second most common complaint buyers had about handmade dice, behind only balance issues. Inking isn’t decoration — it’s usability.
Inking fills those engraved channels with opaque paint, creating contrast between the number and the face. A black-inked number on a translucent blue die. Gold lettering on deep red resin. White numbers on a void-black set. The paint sits only in the recessed areas, leaving the polished face untouched. Done well, it looks like the numbers were always part of the die. Done poorly, it looks like a toddler found a marker.
The technique itself takes ten to fifteen minutes per set. But the difference between “professional quality” and “obvious homebrew” often comes down to paint choice, drying patience, and cleanup method.
Paint Options for Dice Inking
Not all paints work equally well in engraved resin. You need something opaque enough to fill the channel in one or two passes, thin enough to flow into fine details, and durable enough to survive years of rolling across wood and felt. Here are the main categories.
Acrylic Craft Paint (Citadel, Vallejo, Golden)
Miniature paints from brands like Citadel and Vallejo are purpose-built for filling fine details on small surfaces. They’re water-based, heavily pigmented, and available in every color you can imagine. Vallejo Model Color is a favorite among dice makers for its consistency — thick enough to stay in the engraving, thin enough to wipe cleanly off the polished face.
Golden Heavy Body acrylics work too, though they’re thicker out of the tube and sometimes need a drop of water to flow properly into narrow channels. Avoid cheap craft acrylics from the dollar store. They’re poorly pigmented, requiring three or four coats to achieve opacity, and they tend to leave a chalky residue on the face that’s difficult to clean.
Paint Pens (Posca, Molotow)
Uni Posca markers are popular for dice inking because they’re convenient — no brushes, no palettes, no cleanup. The paint is water-based acrylic, opaque, and flows directly into engravings with the pen tip. The fine-point (PC-3M) and extra-fine (PC-1M) sizes work best for standard polyhedral dice.
The limitation: paint pens deposit less paint per pass than a brush, so you may need two or three applications on deeply engraved numbers. They also struggle with very narrow engravings where the felt tip can’t reach the bottom of the channel.
Metallic Options
Gold, silver, and copper inking can elevate a set from good to stunning. Vallejo Metal Color and Citadel’s Retributor Armour (gold) or Leadbelcher (silver) are reliable choices. Metallic paints contain actual metal flakes suspended in acrylic medium, so they settle quickly — stir or shake thoroughly before each use.
Warning: Metallic paints are harder to wipe clean than standard acrylics. The metal particles can leave a faint shimmer on the polished face if you’re not careful during cleanup. Use a slightly damp cloth rather than a soaking wet one, and wipe in a single direction across the face instead of scrubbing in circles.
Alcohol-Based vs. Water-Based
Most dice makers use water-based acrylics, and for good reason: they clean up with water, they don’t attack cured resin, and mistakes wipe away easily. Alcohol-based inks (like Copic refills or alcohol ink) penetrate resin surfaces differently — they can stain the face around the engraving, leaving a halo that’s nearly impossible to remove without re-sanding.
Stick with water-based unless you have a specific reason not to. Your polished faces will thank you.
The Inking Technique Step by Step
The actual process is straightforward. The skill is in the patience.
What You Need
- Acrylic paint or paint pen of your choice
- A fine-point brush (size 0 or 00) if using bottled paint
- A damp lint-free cloth or unscented baby wipes
- Paper towels
- Good lighting — a desk lamp angled low across the die face reveals details you’ll miss under overhead light
The Process
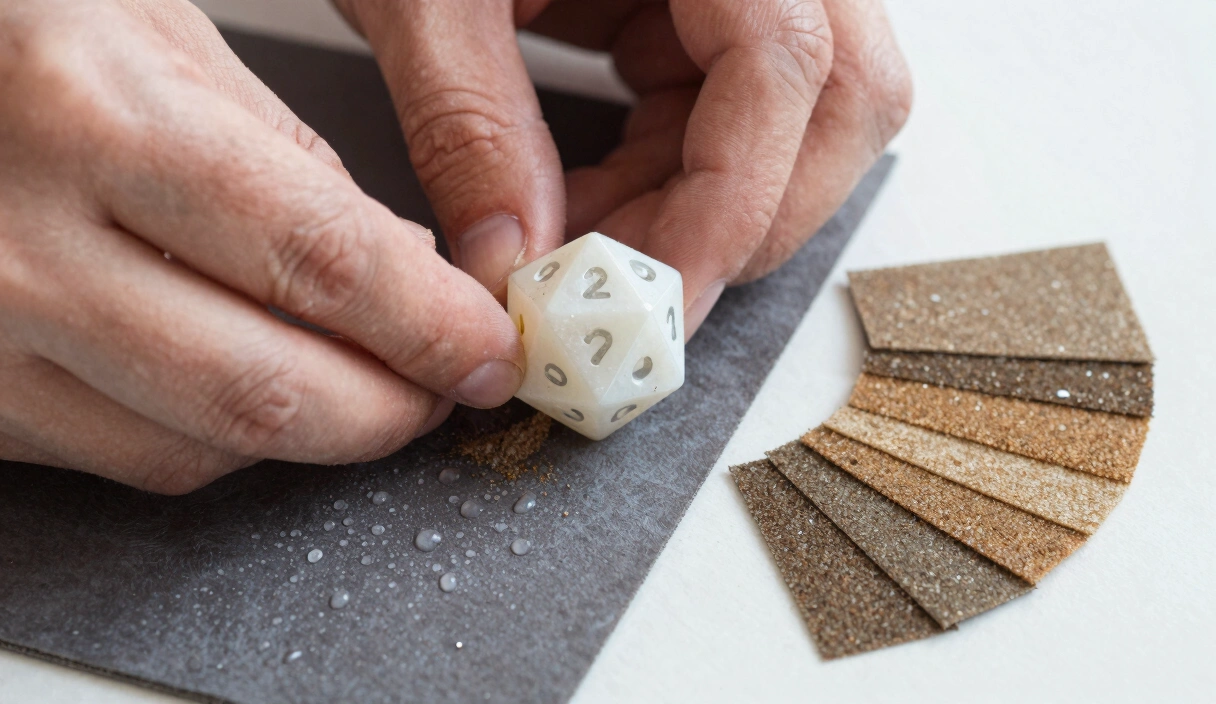
Step 1: Apply paint into the engravings. Load your brush with paint and work it directly into the number channels. Don’t be precise here — you want paint in every part of the engraving, including the corners and serifs. Overshoot liberally. Paint on the flat face is fine at this stage. It’s coming off in a minute.
Step 2: Let it set for 5 to 10 minutes. This is the step people skip, and it’s the step that determines whether you get crisp numbers or smeared disappointment. The paint needs to tack up — become dry to the touch but not fully cured — so it stays in the engraving when you wipe the face. If you wipe too early, the cloth pulls paint out of the channels. If you wait too long (30 minutes or more), the paint on the face becomes difficult to remove without solvent.
Five to 10 minutes at room temperature is the window. Check by lightly touching the paint on a flat area of the face. If it feels sticky but doesn’t transfer to your finger, it’s ready.
Step 3: Wipe the face clean. Take a slightly damp cloth or baby wipe and draw it across the die face in a single, firm stroke. One direction. Don’t scrub back and forth — that pushes paint back into areas you just cleaned. Rotate the cloth to a clean section and repeat if needed. The paint on the polished face lifts off; the paint in the engraving stays put.
Maker’s Note: I use Huggies Natural Care wipes. They’re the right dampness — wet enough to dissolve surface paint, not so wet that they flood the engravings. Whatever you use, make sure it’s unscented and alcohol-free. Scented wipes sometimes contain oils that leave residue on the resin.
Step 4: Inspect and repeat. Hold the die under your desk lamp and rotate it slowly. Look for thin spots where the paint didn’t fully fill the channel, especially in narrow areas like the top of a “1” or the crossbar of a “4.” If you see gaps, let the first coat cure fully (1 hour minimum), then apply a second coat following the same process.
Two coats is normal. Three coats means your paint is too thin or your engravings are unusually deep.
Metallic and Specialty Effects
Once you’re comfortable with basic inking, specialty paints open up effects that turn a solid set into something people photograph.
Gold, Silver, and Copper
Metallic inks look best on dark or richly colored resin. Gold on deep purple. Silver on black void dice. Copper on forest green. The contrast between the organic warmth of metal flake and the synthetic clarity of resin is striking — it’s the combination that makes people pick up a die and tilt it under the light.
Apply metallics slightly thicker than standard acrylics. The metal particles need density to reflect light uniformly. A thin coat of metallic paint looks grey and dull rather than metallic.
Color-Shifting Paint
Color-shifting or chameleon paints (like those from Culture Hustle or Green Stuff World) contain interference pigments that change hue depending on the viewing angle. A number that looks gold straight-on shifts to green or purple as you tilt the die. The effect is genuinely mesmerizing and photographs beautifully.
The catch: color-shifting paints are typically less opaque than standard acrylics. Plan on three coats minimum, with full drying time between each. Rush this and the numbers look muddy rather than magical.
Glow-in-the-Dark Numbers
Glow paint (strontium aluminate pigment in acrylic medium) creates numbers that charge under light and glow in the dark. Perfect for horror campaigns, late-night sessions, or dice that just need one more reason to be picked up and admired.
Glow pigment particles are coarse — larger than standard acrylic pigments — so the paint doesn’t flow into fine engravings as easily. Use a brush rather than a paint pen, and work the paint into the channels with the tip. Apply two to three coats. The glow intensity is directly proportional to pigment density, so thin coats glow poorly.
Who says your dice can’t haunt the table after someone turns off the lights?
Fixing Mistakes
Inking mistakes are among the most forgiving errors in the entire dice-making process. Almost everything is reversible.
Cleaning Stray Paint
If paint dried on the polished face and your damp cloth isn’t cutting it, dip a cotton swab in acetone (nail polish remover, 100% acetone, not the moisturizing kind) and gently roll it across the stray paint. The acetone dissolves cured acrylic in seconds. Work quickly and precisely — prolonged acetone contact can cloud polished resin surfaces. A quick pass dissolves the paint. A lingering soak hazes the finish.
Warning: Test acetone on a hidden face first if you’re using a resin you haven’t worked with before. Some polyurethane resins are more acetone-sensitive than standard epoxy. If the test area hazes, switch to isopropyl alcohol (91% or higher), which dissolves acrylic more slowly but won’t damage the resin surface.
Re-Inking Faded Numbers
Over time — months or years of regular play — inked numbers can wear. The paint slowly abrades, especially on high-contact faces. Re-inking is the same process as initial inking: clean the die, apply paint, let it set, wipe the face. No re-sanding needed. The engravings don’t wear out; only the paint does.
Sealing with Clear Coat
For dice that will see heavy use, a thin clear coat over the inked numbers adds durability. A single layer of gloss varnish (Vallejo Gloss Varnish or Liquitex Professional) applied with a fine brush over each number — not the entire face — locks the paint in place. Let it cure for 24 hours before rolling.
Don’t coat the entire die face. A full-face varnish changes the optical properties of polished resin and can affect how the die slides across surfaces, which matters if you care about fair rolls. Check the balance test after coating to make sure nothing shifted.
Inking won’t rescue a die with bad geometry, and it won’t fix numbers that were poorly engraved in the master. If the channels are too shallow, paint won’t stay. If they’re uneven, no amount of careful brushwork will make them look uniform. The ink reveals the quality of everything that came before it — the modeling, the mold, the pour, the sanding. It’s honest that way. But when the upstream work is solid, those ten minutes with a brush and a baby wipe are the most satisfying part of the entire build.
Recommended Finishing Supplies
Zona 37-948 Polishing Paper Assortment (1-30 Micron)
6 progressive grits from 30µ to 1µ. The gold standard for hand-polishing sharp-edge dice to glass clarity.
Check Price on Amazon* Affiliate links. Prices last updated March 6, 2026.
Frequently Asked Questions
Can I use Sharpie or permanent marker instead of acrylic paint?
You can, but it’s a temporary solution. Permanent marker fades within weeks of regular handling — the oils from your skin break down the ink. It also doesn’t fill deep engravings with enough opacity to be legible at table distance. Acrylic paint is more durable, more opaque, and easier to fix if you make a mistake. Sharpie works in a pinch for personal dice you don’t mind re-inking monthly.
How do I ink numbers on glitter or inclusion dice without ruining the surface?
The same technique applies, but be more cautious with the wiping step. Inclusions near the surface can create tiny ridges where paint catches and resists wiping. Use a barely damp cloth and wipe with very light pressure. If paint sticks around an inclusion, let it dry fully and remove it with an acetone-dipped cotton swab, touching only the stray paint. Patience matters more here than technique.
Do I need to ink before or after the balance test?
Ink after testing. The paint adds a small amount of mass to the engraved side of each face, and while the effect is negligible for casual play, testing an un-inked die gives you the truest reading of the resin geometry itself. Once you’ve confirmed the die floats evenly, ink away.
What color ink works best for readability?
Maximum contrast wins. Black ink on light or translucent dice. White ink on dark dice. Metallics (gold, silver) work on both light and dark resin because the reflective particles create contrast through luminance rather than color alone. Avoid inking with a color close to the resin color — red numbers on red dice look artistic in photos and are unreadable at the table.
Related Articles
Chessex Dice: The Brand Everyone Starts With (and Whether to Stay)
Chessex dice sit in every game store on Earth, but are they good or just cheap? An honest breakdown of every product line, balance, and value.
How to Polish Resin Dice: From Cloudy to Crystal Clear
Your dice look like frosted glass, not gemstones. Here's the exact sanding and polishing sequence that fixes that — no shortcuts, no myths.
How to Sand Resin Dice: The Complete Grit Progression Guide
Master the 400-to-12000 grit sanding progression for resin dice. Zona papers, wet sanding technique, and the mistakes that keep your dice cloudy.